
How to manage your Plesk server
Plesk is a platform that allows the management of your web projects without needing special skills in DevOps. The tool is suitable for businesses, web agencies and professional resellers. No more need for terminal and command lines to deploy your projects, website, database, e-mail etc.
This article walks you step by step through doing essential web hosting tasks with Plesk.
STEP 1: SEND YOUR WEBSITE
If you have created your website yourself or have contracted out a web designer for this task, you will need to submit your site content to Plesk before it becomes available online. In Plesk, you can send the content by FTP or the file manager. The instructions below show you both methods. Choose the one that matches your situation.
To publish a website using FTP:
- Download an FTP client program. You can use whichever suits you. If you don’t know which one to choose, use FileZilla:
- Connect to your subscription on the server by FTP client. To log in, you need the following information:
- FTP server address: The FTP address should look like this: ftp://your-domain-name.com, where “your-domain-name.com” is the Internet address for your site.
- FTP username.It is the same as your system username. Note: The system username may be different from the username you use to log into Plesk. To find your system username, open the Websites & Domains tab and click Web Hosting Access. You will find it under Username. You can change your system username if you wish.
- FTP password.It is the same as your system user password. If you do not know the password for your system user, click Websites & Domains and click Web Hosting Access. You can reset your password by clicking on the Password.
- Activate passive mode if you are behind a firewall. Consult your FTP client documentation to find out how to switch to passive mode.
- Upload your site files and directories to the httpdocs directory.
To publish a website using File Manager:
- On your computer, add the folder containing your website files to the ZIP Archive folder.
- On the Plesk Control Panel, on the Files tab, click the httpdocs folder to open it. Click Submit, select the archive file, and click Open.
- Once you have sent the file, check the box next to it and click on the More button. Select the option to extract the files.
The website you submitted may require a database to work. To see how to create a database, go to step 2
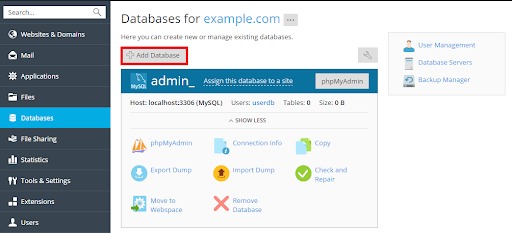
STEP 2: CREATE A DATABASE
Databases are relational structures used to store data. They are essential for modern web hosting. Additionally, most popular CMSs require a database to function. Plesk supports MySQL, MSSQL, and PostgreSQL database servers. From Plesk, you can add and modify databases, access them, as well as manage database users.
If your website does not require a database, go to the next step to learn how to create an email account in Plesk.
To create a database and database user:
Go under Database > Add database.
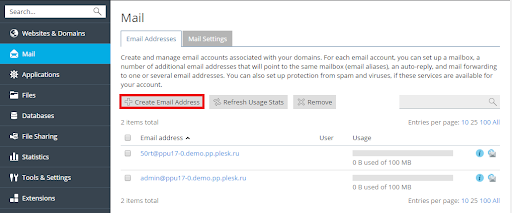
STEP 3: CREATE AN EMAIL ACCOUNT
The messaging service allows Internet users to exchange emails. Plesk can act as the mail server. You can also create and manage email accounts, as well as perform many common email operations. For example, you can change the password of an email account, activate automatic replies, etc.
To create an email account, go to Mail> Create Email Address.
Enough to the simplicity of Plesk that you or your clients can complete their projects with just a few clicks. For more information on Plesk hosting, please do not hesitate to contact us.