
How to install an SSL certificate on Plesk
This article provides step-by-step instructions for installing your certificate in Plesk. If this is not the solution you are looking for, you can find the answer to your question by clicking on one of the links below:
- How to install an SSL certificate on Microsoft Internet Information Service (IIS)
- How to install an SSL certificate on Apache
- How to install a certificate on MS Exchange
PRE-REQUISITES NECESSARY BEFORE STARTING
You can only follow this guide if the following conditions are met :
- You have Plesk hosting: whether it is shared hosting, a private server or a dedicated server.
- Votre hébergement mutualisé ou serveur privé ou serveur dédié est doté du système d’exploitation LINUX et non pas Windows.
- Your domain name is active and points to your shared hosting or private server or dedicated server.
Step 1: Generate Certificate Request (CSR)
The first step is to generate a certificate request (CSR) on your server before you can purchase and install an SSL certificate.
- First go to your client interface then click on the subscription in question (whether it is a shared hosting, a private server or a dedicated server) then follow the link to go to Plesk and finally click on “SSL certificates” then follow the button “Add SSL certificate on Plesk Server”
- If you have ordered a certificate, OV SSL or EV SSL, just put www.yourdomain.tld in the Domain name field and be very precise about the data entered in this form, because they must comply with the whois data of the domain name, which also must comply with company data.
- Then click on the “Request” button. You will therefore see the certificate appear. Click on it.
- Get the CSR, you will need it for ordering the SSL certificate. Above all, do not lose the CSR / Private key pair. The private key should not be given to anyone and it should not be used on any online tool because, as the name suggests, it is private.
Step2: Log in to Plesk.
Step 3: Go toDomains> example.com> SSL / TLSCertificates> Advanced Settings.
Step 4: On the SSL / TLS Certificates page, add your certificate:
-
- If an SSL certificate is stored in a single
*.crtfile: Click Browse… to select a certificate file. Then click Upload Certificate.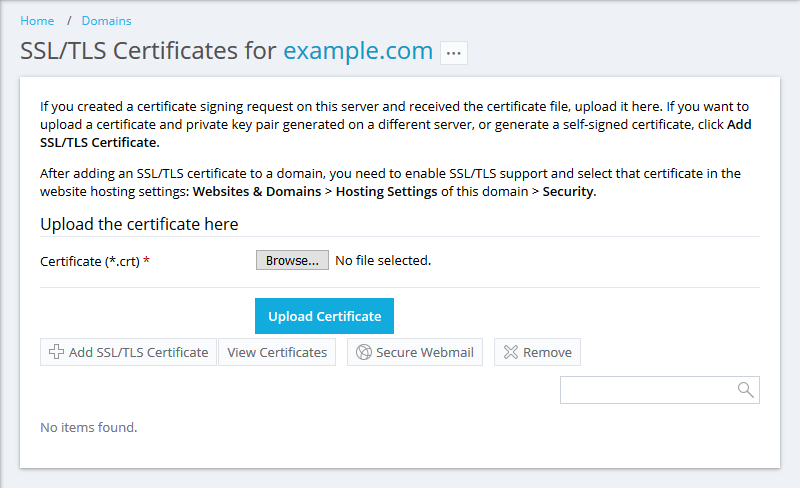
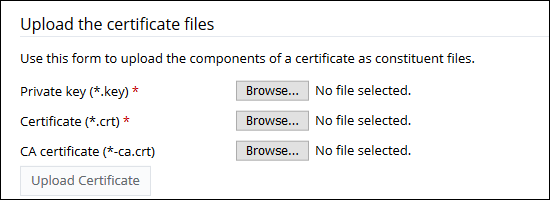
-
If an SSL certificate is stored as
*.keyand*.crt: Click Add SSL / TLS Certificate and scroll down to the Download Certificate Files section and download these files. If the certificate and the private key parts of your certificate are contained in a*.pem(you can verify this by opening the*.pemfile in any text editor), simply upload it twice, at a time as a private key and as a certificate. Click Upload Certificate when done.
- If an SSL certificate is stored in a single
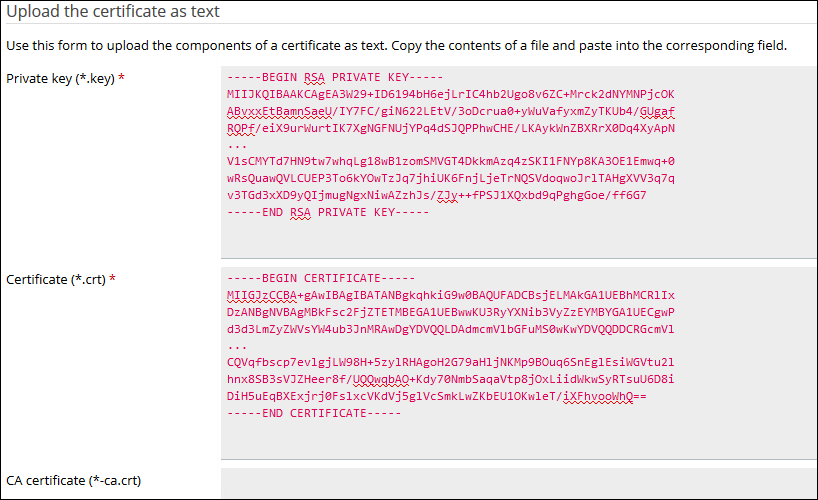
- If an SSL certificate is stored as text: Click Add SSL / TLS certificate and scroll down to the Download certificate as text section. There, paste the certificate and the private key parts in the corresponding fields. Click Upload Certificate when finished.
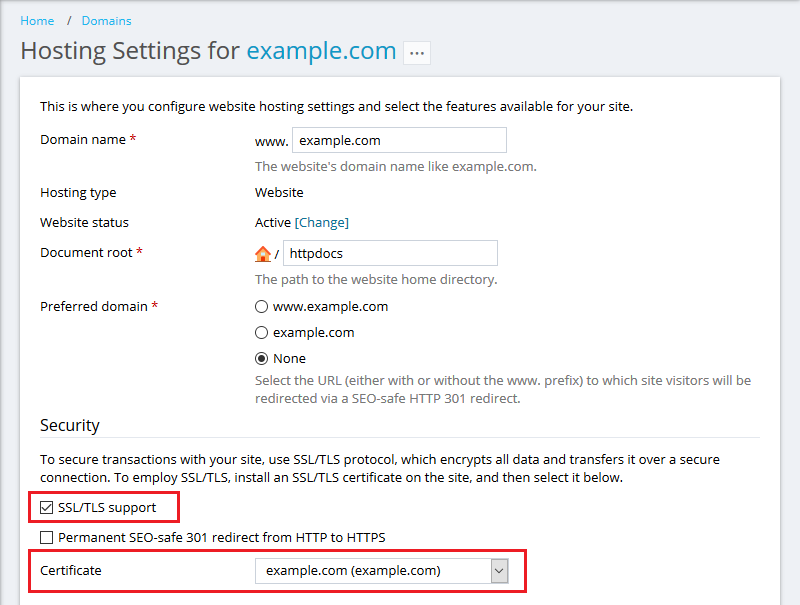
Step 5: Once the certificate is created, go to Domains> example.com> Hosting settings and:
- activate SSl/TLS support
- select your created SSL certificate click OK
Step 6: Open your website at https://example.com.
Note: If there is a problem, make sure the certificate has been selected correctly.
OXABOX offers you the installation of SSL certificates on plesk by our qualified experts. Do not hesitate to contact us.