How to install an ssl certificate on windows server 2016 (IIS 10)
The SSL certificate is a credibility factor, used to guarantee secure and encrypted information exchanges. It is also used to verify that you are connected to the desired service not to a fraudulent clone.
This article is the first in a series of articles to guide you through installing your SSL certificates. When choosing your SSL certificate, it’s best to check with your web host or IT department to make sure you’re choosing the right option for your entire business.
This is a list of frequently asked questions:
- How to install an SSL certificate on Microsoft Internet Information Service (IIS)
- How to install an SSL certificate on Apache
- How to install an SSL certificate on Plesk
- How to install an SSL certificate on MS Exchange
In this first part, we answer the first of the questions: the steps for installing a Microsoft SSL certificate (IIS) If you have not yet created a CSR and ordered your certificate, see IIS 10: How to create your Windows Server 2016 CSR
After validating and issuing your SSL certificate, you must install it on the Windows 2016 server on which the CSR was generated. Then you need to configure the server to use it.
HOW TO INSTALL AND CONFIGURE A SINGLE SSL CERTIFICATE: CERTIFICATE FOR A DOMAIN
Step 1: On the server where you created the CSR, save the .cer file of the SSL certificate (for example, your domain_com.cer) that OXABOX sent you.
Step 2: From Windows Start menu, type Internet Information Services (IIS) Manager and open it.
Step 3: In Internet Information Services (IIS) Manager, in the Connections menu tree (left pane), locate and click the name of the server.

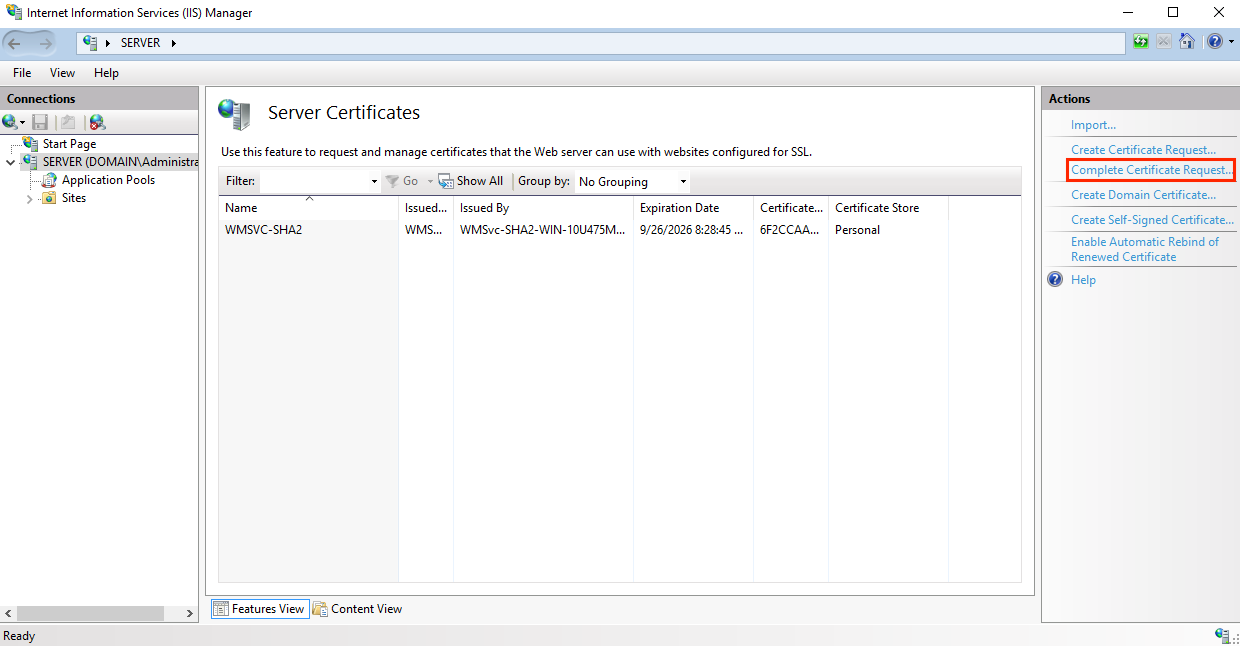
Step 4: On the server name home page (middle pane), in the IIS section, double-click Server certificates.
Step 5: On the Server Certificates page (middle pane), in the Actions menu (right pane), click the Complete certificate request link
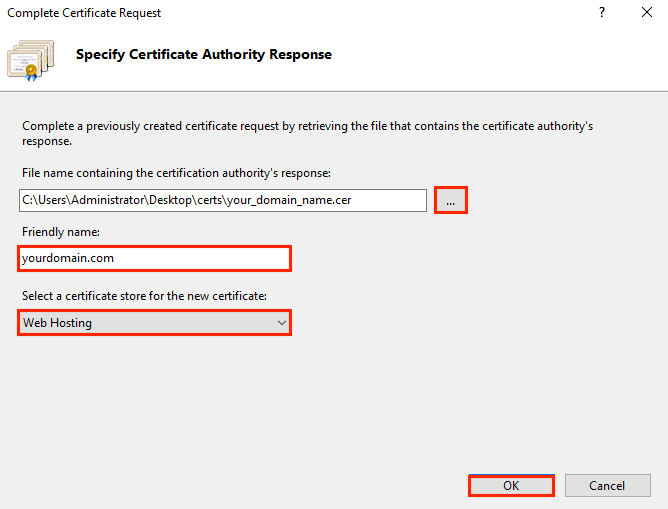
Step 6: In the full certificate request wizard, on the Specify the response from the certification authority page, do the following, and then click OK:
- File name containing the Click on the … box and browse for and select the .cer file
- Response from the certification authority: (for example, your_domain_com.cer) that OXABOX sent to you.
- Familiar Name: Type a friendly name for the certificate. The friendly name is not part of the certificate; instead, it is used to identify the certificate. We recommend that you add OXABOX and the expiration date at the end of your friendly name, for example: yoursite-oxabox- (expiration date).
- Select a store for the new certificate: From the drop-down list, select Web Hosting.
Step 7: Now that you have successfully installed your SSL certificate, you need to assign the certificate to the appropriate site.
Step 8: In Internet Information Services (IIS) Manager, in the Connections menu tree (left pane), expand the name of the server on which the certificate was installed. Then expand Sites and click on the site that you want to use the SSL certificate to secure.
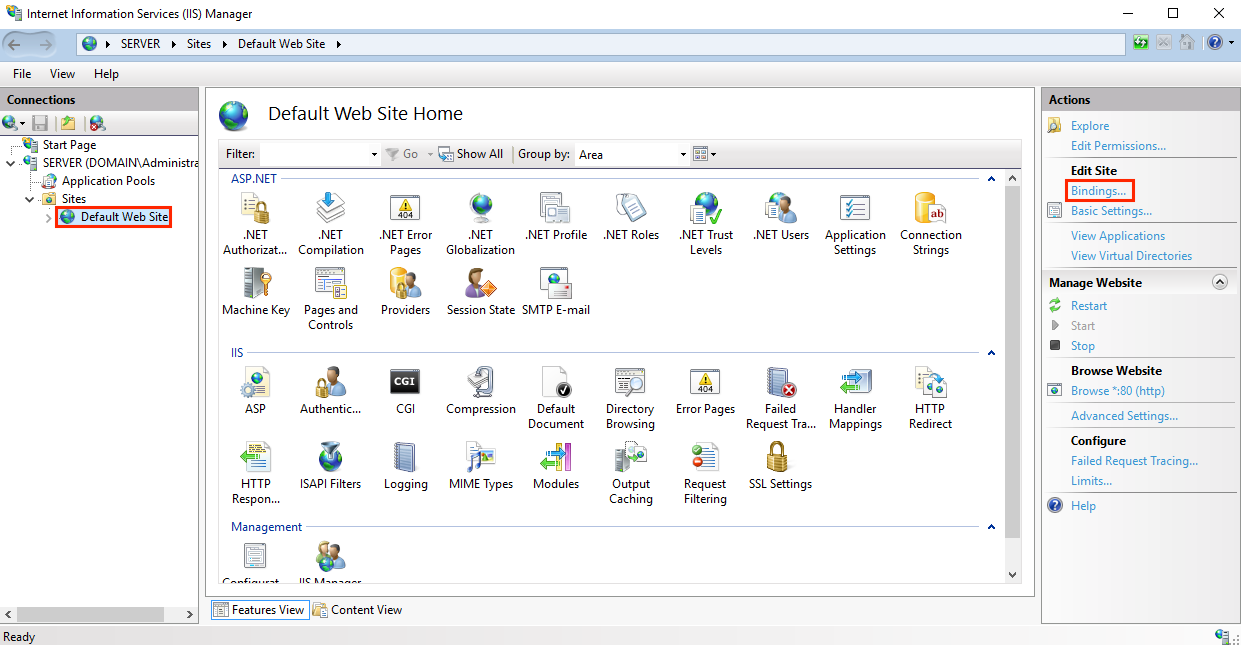
Step 9: On the website home page, in the Actions menu (right pane), under Edit Site, click on the Links link
Step 10: In the Site Bindings window, click Add.
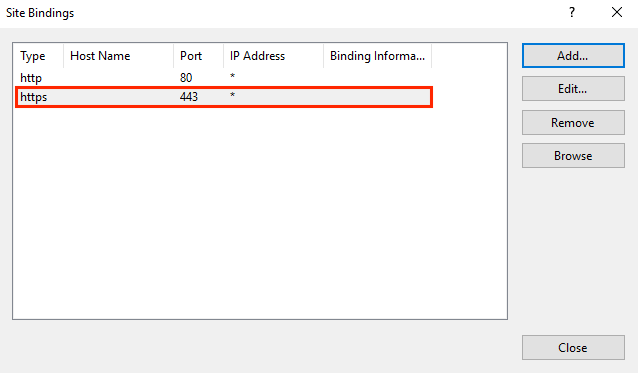
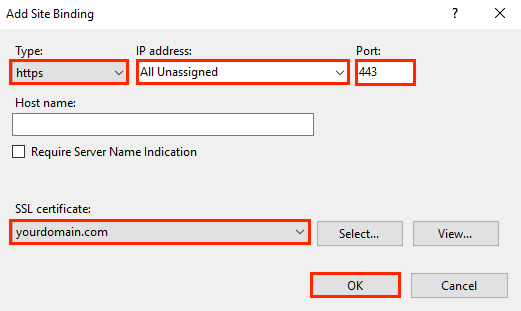
Step 11: In the Add Site Bindings window, do the following, and then click OK:
- Type: From the drop-down list, select https
- Address IP: From the drop-down list, select the site’s IP address or select All Unassigned. .
- Port: Type port 443. The port on which traffic is secured by SSL is port 443.
- SSL Certificate: From the drop-down list, select your new SSL certificate (for example, yourdomain.com).
Your first SSL certificate is now installed and the website configured to accept secure connections. Test your installation: Use a different web browser to test that your certificate is working. Force SSL connection by connecting to your website using “https: //”. You should see the padlock icon in your address bar.
To install and assign an additional SSL certificate, repeat the above steps, if necessary.
OXABOX offers you the installation of Microsoft server SSL certificates by our qualified experts. Do not hesitate to contact us.